Thursday, February 26, 2009
Apple bread... Mmmm.....
This apple bread recipe was given to me by someone I knew, and actually I don't think they really appreciate this recipe the way I do... I bake this so often, the old recipe sheet that I had it on was covered in stains from all of the ingredients... It's so easy to make too! It makes two loaves, which I think is perfect, one to keep at home and one to take to work or give away!
I was actually super sad for a minute because I couldn't find my recipe, but remembered that I had given it to a few people at work after having it. Thankfully, my co-worker still had it and made a copy of it for me. I would have been so sad if I didn't get another copy! This bread is a hit! My yiayia (grandmother) even told my mom and me that she liked this bread more than she liked any cake my mom has ever made! My poor mom was not too happy about that...
The bread is nice and moist, with out being greasy or oily like the cake I made recently. It's very light and fluffy almost, and the apples are tender and have a very sweet tartness to them, which keeps the bread form being way too sweet.
The Recipe (exactly as it was given to me):
3 cups of all-purpose flour
1 tsp ground cinnamon
1 tsp baking soda
1 tsp salt
3 large eggs
1 cup veg oil
2 cups granulated sugar
1 tsp vanilla extract
3 cups diced apples
1 cup chopped walnuts (optional)
Preheat the oven to 325 degrees F. Spray 2 9 X 5 X 3 inch loaf pans with some Pam. Set aside.
In a medium bowl, combine flour, cinnamon, baking soda and salt; set aside.
In a large mixing bowl, beat the eggs, oil, vanilla and sugar together, mixing well. Stir in flour mixture until just mixed. Fold in apples and walnuts (if adding) and sppon into prepared loaf pans.
Bake for 1 hour and 15 minutes or until tested done when a toothpick comes out with little crumbs. Cool 10 minutes (or longer if necessary) before removing to continue cooling on wire racks. ***
Okay, so I do a couple of things differently, nothing dramatic though. First off, I cut the apples first, sprinkle them with lemon juice and cinnamon-sugar. I also use about 6 apples, which makes more than 3 cups, but hey, I love apples! While those are off to the side, I make the batter. The batter is THICK. Make sure when you are folding the apples into the batter, you use a sturdy wooden spoon b/c a plain old spatula spoon will most likely break in half...
I also add more than a 1 tsp of cinnamon. I like the cinnamon so I don't mind adding an extra tsp.
After I spoon the batter in the loaf pans, I sprinkle some raw sugar on top for some extra sweet crunchiness.
Sunday, February 15, 2009
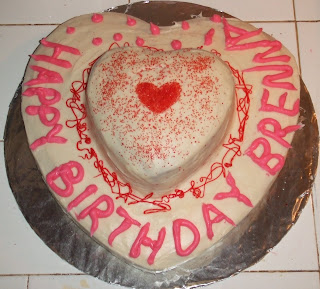
Valentine themed Birthday Cake
So for Valentine's day and my pseudo-sister's 18th birthday, I made a red velvet cake with cream cheese frosting. Both recipes are from past blogs of mine... I used a 12 inch heart shaped pan and a 6 inch heart shaped pan. I doubled both recipes (but kept the sugar on the frosting recipe at 2 1/2 cups). I ended up having enough to make 10 cupcakes as well.
I found that even though I let the cake cool in the refrigerator, the crumb coat that I put on still made the cake crumb a bit. I think the frosting was still too cold and wasn't going to spread as nicely as it did later, but it's okay b/c the frosting had a light speckled look to it, which was kinda cool looking. Plus the second coat kinda covered most of it, so it didn't look bad at all.
I also found a trick to making cream cheese frosting a little more smooth looking. I put on powderless gloves and got a moist paper towel and smoothed it out w/ my gloved fingers. I used the paper towel to wipe off the excess that stuck to the gloves and then the wetness that lingered on the gloves helped smooth it out even better. I was having a heck of a time w/ the spatula I normally use b/c this cake wasn't a normal flat, round or square cake. I got the frosting on there w/ the spatula, but for some reason, it just kept pulling the frosting off when I went to smooth it out. It worked so well and the cake was completely smooth!
The icing for the letters and the decoration on the bottom layer was just the frosting w/ tons of extra powdered sugar (I'm not sure how much extra I used) to make it stiffer and food coloring. For the little red swirly stuff, I just took some wax paper (I didn't have parchment paper, otherwise I would have used that, it's much stronger!) and made a cone out of it, making the tip super super tiny. Then I squeezed and just swirled it around.
The top heart was made using a stencil and red sugar crystals.
The letters were done w/ a small round tip and a disposable plastic bag. I would have done the letters even smaller, but the cut the bag to fit the tip and it was too big for the smallest tip :(
Since the cake was too big to fit in one of my cake pans, I bought some 14 inch cardboard rounds from Michaels and covered it with foil to make it not look ugly. When I put the cake on the round, I laid some wax paper around the edges so when I frosted the cake, the board wouldn't get all covered in frosting and stuff. Don't put the paper underneath the cake too much, otherwise, you may never get it off w/out pulling the cake apart.
The cake tasted great, as usual. Light and fluffy and just a hint of cocoa. The frosting was great too. I had a little bit extra that I am going to save to try on these other cupcakes I am getting a recipe for soon (Amanda made these fantastic strawberry cupcakes w/ strawberry frosting, she's emailing me the recipe) and I thought it would be nice on top of some of them.
Tuesday, February 10, 2009
"There's a hole in this cake"
"It's a bundt."
"A Bundt?"
"Bundt."
"Bunk?"
"Bundt."
"Buuun-t."
"Bundt, Bundt."
" Einai cake, mori."
"Ohhhh... It's a cake! I know! Thank you! Thank you very much!"
So I woke up Sunday morning, ridiculously early for being out late Saturday night, and decided I was going to make my apple bread. I love my apple bread. Mmmm..... that's some good stuff right there. So I go on a search for my apple bread recipe. And I cant find it!!! I tore apart my recipe/cookbook section of my room. Nowhere!!! I was getting really pissy when I realized that two of my co-workers have the recipe! Now if I only had their phone #'s...
Well, in the middle of looking for the recipe, I cam across some others I've been wanting to try and then this apple cake recipe. I figured that it would take too much effort (and I would have to wait for a more decent hour---it was 7am) to get the apple bread recipe right then, so I decided on the apple cake. I've never made it before and honestly, I'm not even sure where it came from. It was just one of the many recipes I copied and pasted to Word with a bunch of other apple recipes after my friend Anastasia and I went apple picking last fall.
So I started making the cake. It was really easy to make, but there is a heck of a lot of fat in it. It's got 4 large eggs, 1 1/2 cups of veg oil and 1 stick of melted butter. I had a feeling this was going to be one moist cake... I wasn't disappointed...
Recipe:
For the apples:
1 1/2 pounds Granny Smith apples, peeled, cored and cut into chunks
1 lemon, juiced
1/4 cup sugar
1 teaspoon cinnamon
For the batter:
4 large eggs
1 1/2 cups vegetable oil
1 stick unsalted butter, melted
2 cups sugar
1 tablespoon pure vanilla extract
1/2 cup warm water
2 1/2 cups all-purpose flour
1/2 teaspoon salt
1 tablespoon baking powder
Directions:
Preheat the oven to 350 degrees F.
Mix the apples with the lemon juice, sugar, and cinnamon in a mixking bowl and let stand while you make the batter.
Lightly whisk the eggs in a large mixing bowl. Add the oil, melted butter, sugar, vanilla and water. Whisk until smooth. In a separate mixing bowl, combine the flour, salt, and baking powder. Use a whisk of the handle of a spoon to mix the dry ingredients together. Gradually stir the flour mixture into the wet mixture and stir just until incorporated. DO NOT OVERMIX! (Seriously, the recipe had this in caps.)
Grease and lightly flour a Bundt pan (or you can use the cooking spray that has flour in it, it's sooooo much easier!). Pour 1/4 of the batter into the pan, then arrange 1/3 of the apples around the top of the batter. Make 2 more layers of apples, smoothing the batter over them after each addition. Top off with the last of the batter and smooth.
Bake about 1 hour and 10 minutes, until risen, the top is nicely browned, and a sharp knife inserted in the middle comes out with tiny little crumbs stuck to it, but not wet batter.
*****Okay, so I didn't have 1 1/2 pounds of apples; I only had 4. So my cake wasn't as apple filled as I would have liked. Also, after I sprayed the bundt pan, I sprinkled cinnamon sugar on the bottom of the pan like this:
I was hoping for a bit more crunch to the cake. It did make the outer crust more like a crust than soft moist cake, but not really what I was going for.
After I poured in the first layer, I dumped a third of my apples, but when I poured batter enough to cover them, there wasn't going to be enough batter to do four layers of batter, so I dumped the rest of the apples on that layer and then the rest of the batter. I didn't measure that first 1/4 very well... I also sprinkled more cinnamon sugar on top of the apple layers. I love cinnamon...
I baked the cake about 5 minutes longer than the recipe said to. The knife came out still wet after the time was up, so I tried 5 more minutes and it was perfect timing. That's some yummy GBG (golden brown goodness) right there.
I let the cake cool in the bundt pan for about 15 min and then turned it over onto the cake holder base. I let it cool for about another hour before I let my dad cut into it. You can see in the last picture just how "moist" this cake was, especially around the chunks of apples (which, of course were wet from the lemon juice). I think I am going to cut back on the oil and butter next time. Kinda of cut out the same percentage of both or something. At one point, I used my fingers and the knife to help guide the piece of cake to the plate and my hand came away a bit slickish. Not greasy so much as just moist.
It has a lot of flavor and there would be even more if I had more apples. The cake itself has a very buttery vanilla taste to it, which is good, but also very filling, so a small piece of this will get you full fast.
All in all, a good cake for the apple lovers out there.
Oh, and one of my co-workers brought me their copy of my apple bread recipe, so I'll be making that soon!
Sunday, February 8, 2009
Banana bread w/ a crunchy cinnamon sugar walnut topping
Did you know there is a banana museum in Auburn, Washington? The website was pretty cool, but at the bottom, you can view pictures of the museum. Kinda funny...
Bananas are great, aren't they? :)
Anyways, I love baking with fruit. Sometimes I would rather have some cake or pie or bread w/ tons of fruit in it that something chocolate *gasp*
This recipe comes from Baking Illustrated.
2 cups all-purpose flour
1 1/4 cups walnuts, chopped coarse
3/4 cup sugar
3/4 tsp baking soda
1/2 salt
3 very ripe bananas, mashed well
1/4 cup yogurt
2 large eggs, lightly beaten
3/4 stick unsalted butter, melted and cooled
1 tsp vanilla extract
1. Adjust an oven rack to the lower-middle position and heat the oven to 350°F (175°C) degrees. Spray the bottom and sides of a 9 by 5-inch loaf pan with Pam.
2. Spread the walnuts on a baking sheet and toast until fragrant, 5 to 10 minutes. Set aside to cool.
3. Whisk the flour, sugar, baking soda, salt, and walnuts together in a large bowl; set aside.
4. Mix the mashed bananas, yogurt, eggs, butter, and vanilla with a wooden spoon in a medium bowl. Lightly fold the banana mixture into the dry ingredients with a rubber spatula until just combined and the batter looks thick and chunky. Scrape the batter into the prepared loaf pan.
5. Bake until the loaf is golden brown and a toothpick inserted in the center comes out clean, about 60 minutes. Cool in the pan for 5 minutes, then transfer to a wire rack. Serve warm or at room temperature. (The bread can be wrapped with plastic wrap and stored at room temperature for up to 3 days.)
I only changed two things in this recipe. One, I added another 1 1/2 bananas. (I accidentally dropped half of one on the floor, so Shadow got to eat it. Lucky dog)
The other thing I changed was the walnuts. I took the walnuts and tossed them in a frying pan w/ butter and cinnamon sugar and them put them on top of the batter before cooking. Then I sprinkled some raw sugar on top of that. I wanted a crunchy top. Before it went in it looked like this: After it came out it looked like this:
It is definitely tasty and very moist. The extra banana didn't make it crazy overpowering and I definitely prefer the walnuts on top rather than inside. I would probably use a little less walnuts on top next time. Some of it didn't stick t the batter and while I was happy to munch on the fallen pieces, it was kind of a waste to have a lot fall off. But this is definitely a keeper recipe otherwise!
Saturday, February 7, 2009
The Cookie Bible
I love cookies. Making them, eating them, whatever. They are so easy to make and so easy to eat!
These cookies are from a book I got on clearance at Borders. It cost me a whole $3. I love their clearance section. Anyways, these are called Double Chocolate Cranberry Chunkies. This is my attempt at making up for that horrible chocolate cranberry cookie recipe I used on X-mas. It's actually pretty similar to a plain old chocolate chunk recipe. And of course, so easy to make.
1 3/4 cups all-purpose flour
1/3 cup unsweetened cocoa powder
1/2 teaspoon baking powder
1/2 teaspoon salt
1 cup (2 sticks) butter, softened
1 cup granulated sugar
1/2 cup packed light brown sugar
1 egg
1 teaspoon vanilla
2 cups semisweet chocolate chunks or large chocolate chips
3/4 cup dried cranberries or dried tart cherries
Additional granulated sugar
Preheat oven to 350 degrees.
Combine Flour, cocoa, baking powder, and salt in a small bowl; whisk together until blended. Set aside. Using an electric mixer, beat butter, granulated sugar and brown sugar until light and fluffy. Beat in egg and vanilla until well blended. Slowly add dry ingredients until blended. Fold in chocolate chunks and cranberries.
Drop dough, spacing 3 inches apart. Using the bottom of a glass dipped in the additional granulated sugar, flatten the doughuntil about 2 inches in diameter.
Bake 11-12 minutes or until cookies are set. Cool cookies for 2 minutes on the cookie sheet, then remove and let cool on wire racks.
These cookies were soooooo much better than the ones I made on X-mas. They were chocolaty and chewy and just a little tart from the cranberries. I used semisweet chocolate chips and cut up a milk chocolate bar and tossed those chunks in too. I was in a super chocolate mood, so the more chocolate, the better! Other than that, I didn't change a thing!
My favorite... Oreo cheesecake...
While I was out of my mind with boredom during my sick leave from work, I decided to flip thru some of my old recipes. I used to just love browsing the internet and different sites and just copying recipes that I found to be interesting and printing them up. I would just copy and paste them to Microsoft Word and then print them up and add them to the growing stack of other recipes I've found. While I was flipping thru these printed pages, I found this plain cheesecake recipe. My normal cheesecake recipe (you can see it in an older blog) was similar, but there was flour in it. I personally never really liked the flour because it always made the cheesecake batter kinda lumpy. The finished, baked product was always smooth, but it still bothered me. (I'm kinda OCD about certain things) Well, this recipe didn't have any flour or cornstarch in it so I thought I'd give it a try.
The recipe used graham crackers for the crust, but I hate graham crackers and besides, this was going to be an Oreo cheesecake, so I took half a bag of Oreo cookies, scraped off the cream filling and tossed the cookies in the food processor with a 1/2 stick of melted butter. I pressed the crumbs into the bottom of a 10 inch springform pan that was sprayed with Pam. I then baked the crust in a 350 degree oven for about 5 minutes to set it.
Here is the recipe for the batter:
3- 8ox pkgs of cream cheese
1 1/3 cup sugar
1/2 tsp salt
4 large eggs, lightly beaten
2 tsp vanilla
32 oz sour cream
Using a mixer w/ a paddle attachment, I beat the cream cheese for about 2 minutes on medium setting. I then added the sugar and salt and mixed until the cream cheese is light and a little fluffy. You have to be careful here b/c you do not want to over beat the cream cheese, otherwise it'll start to break down on you.
Then you add the eggs, a little at a time to make sure that it is completely incorporated. You may have to stop and scrape the sides of the bwol before continuing.
Add the vanilla next and the sour cream immediately after.
Once it is just blended, you need to fold in the Oreo cookies. I used the remaining half bag of cookies (and a couple extra from a second bag, I love Oreos) and just broke them into small pieces right over the bowl. I carefully folded them into the batter, making sure it was evenly distributed.
Pour the prepared batter into the springform pan.
Bake at 350 degrees for 1 hour and 30 mins. The cheesecake will rise above the edge of the pan.
If you would prefer to do this in a water bath, make sure that the water is boiling and the springform pan is wrapped tightly in foil. Try using heavy duty foil and wrapping it a few times to ensure the water will not leak into the pan.
Bake at 350 degrees for 1 hour and 30 mins, then turn off the heat, prop the oven door open, but just slightly and leave in there for another hour to set.
To cool, leave cheesecake in its pan on a wire cooling rack. If you did the water bath, take the foil off, but be careful in case water managed to leak in there.
When it has cooled, remove from the pan and cover. Cool it in the refridgerator for at least 4 hours, but for a cheesecake this size, overnight is best.
A couple of things on this. This cheesecake was monstrous. I hate doing water baths, so I didn't use one. For this cheesecake, I think I would. The reaon being, since it is so thick, the middle didn't bake enough in the 1 hour and 30 mins the recipe said it should. So I left it in just a bit longer. The tops and edges were too brown for me. I cut off about 1/4 inch from the edge when I had a piece and scraped off the top. I was still left w/ a huge piece and the inside was great, but I think I would be more careful about that next time.
Also, I think it was way too much sour cream. I think next time I might add another package of cream cheese and cut the sour cream in half.
But this is definitely going to be my new recipe for a cheesecake base. It is creamy and smooth and so rich and decadent. I loved it and I think you will too, even if it is time consuming!