Monday, December 29, 2008

Red and Green Cookies

I am a cookie kind of girl. I like that you can make tons of dough ahead of time and just pull it out whenever you want and bake.
I made these cookies to take to my friend's house for our usual after Christmas walk down memory lane. I basically took my staple chocolate chip recipe and took out the chips and added dried cranberries and pistachios. Yum.


Red and Green Cookies
Makes aprx 3 dozen cookies

3 cups all purpose flour
1 teaspoon baking soda
3/4 teaspoon salt
2 sticks (1 cup) unsalted butter, room temp
1 cup (packed) golden brown sugar
3/4 cup granulated sugar
2 large eggs
1 tablespoon vanilla extract
1 1/2 cups dried cranberries
1 cup coarsely chopped pistachios

Preheat the oven to 350 degree F.

Sift the flour, baking soda and salt together in a large bowl.

Using an electric mixer, beat the butter in a large bowl until fluffy. Add both sugars and beat until blended. Beat in eggs, one at a time. Add vanilla. Slowly add the dry ingredients and beat until just blended.

Using a spatula, fold in the cranberries and pistachios.

Drop dough onto your prepared cookie sheets. I wouldn't recommend using non stick spray b/c that will cause the cookies to spread too much. Place the cookies at least 1 1/2 inches apart.


Bake the cookies until just golden, about 18 minutes for larger cookies, or about 15 minutes for smaller cookies.


You can definitely make these ahead of time as well. Just make sure after they've cooled completely to store them in an airtight container, like the one I used in my top picture.

You can also add chocolate chunks to them. White chocolate would work well with these for the whole xmas theme of the red cranberries and green pistachios, but in all honesty, I am not a fan... I would probably just coarsely chop a bar of chocolate, whichever you prefer, but I would definitely go with milk chocolate, and fold that in with the berries and nuts.
And any variation of dried berries and nuts would work with this, like macadamia and blueberry or cherry and almond.

Thursday, December 25, 2008

Merry Christmas to all!!! And happy double chocolate cherry pistachio cookies!!!!

So I have been craving cherries and pistachios lately. So I bought a few bags of dried cherries and a huge bag of pistachios. Yum... Well, then I realized there was a heck of a lot of them and I remembered some double chocolate cherry cookies I saw on an Ultimate recipe showdown on Food Network. So I went searching... And found them! I made the recipe the way it was online, except I added a half cup of crushed pistachios and used a cup of semi-sweet chocolate chips instead of dark chocolate chunks. I checked out the reviews, and while there weren't many and they weren't all that great, I thought I'd try them anyways. I would definitely use a bit more flour next time.... And probably use a nice tart juice instead of red wine, if I use any other liquid at all. I had to bake them longer than the 10 minutes max. I took them out after 10 minutes, they flattened and after they cooled off, I tried to take them off and they fell apart... So I put them in longer.... They flattened out again but they came off the pan easily and they tasted great.

After they were completely cooled off, I kept them in an airtight container. The reason why I would probably not use red wine again was b/c even though they tasted great, every time I opened the container, red wine scent wafted from the container. I wasn't keen on that smell, which is why I didn't eat any after the first time I opened the container. So, yeah I'll probably sub that for some Pom or cherry juice or something.

The pistachios were a nice addition. Pistachios are my fav and they added a great crunch.

This was how they looked the first time I took them out of the oven, after about 5 or so minutes. I should have know they weren't done b/c they were still shiny.
The next picture was how they looked a few minutes after I took them out the second time. It looks like it might be pretty dry, but it def wasn't. Very moist for sure.


I took this next picture the next morning to see if they were still soft. They were. That was when I got hit w/ the strong wine odor.... I probably should have waited a bit longer to put them into the container. The ones on the bottom stuck together a bit. But then having to eat two cookies stuck together is so much better than just having one!

Monday, December 22, 2008

Athena's Xmas party

So when you get an invite to a small get-together, you think that it is just that. The girls you always hang out with, maybe a couple of extras you haven't seen in a while... But you're Greek and the person's house you are going to is Greek, what are you thinking? Of course there are going to be 500 people there. Of course you shouldn't eat anything all day long b/c there is going to be 5 tons worth of food there. And of course it's going to be good. Of course you shouldn't actually bake anything b/c who is going to eat it when there are 15 other desserts, but duh, you're Greek and you don't go anywhere without something edible. Right? Yep, so I brought an apple pie. Yeah, look at all this food. Catered by Pops.


This was a really yummy bloody Mary dip (above). Athena's friend, Laura makes and sells these mixes. I'll have to find out the name...tSome spinach artichoke dip and tzatziki sauce from Costco's. Olive Bruschetta

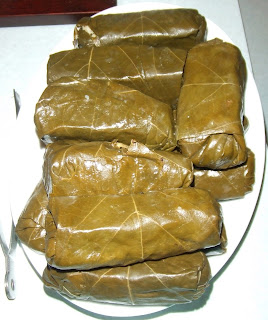
Dolmades
Georgia made an eclair cake, same recipe you can find here. It doesn't look as pretty, but it was still good. The only difference b/w hers and Kraft's is that she lets it sit longer than 3 hours. She usually makes it two days ahead of time so that the graham crackers get really soft. Tastes so much better that way.


My apple pie... mmm.... It was good, but it was wet... Apparently I should have let the apples drain some more before I put them in the pie to bake....

The crust recipe I used is the same one we used on school. I liked the crust so much, I have used it since then for other pies and it is still great. Here is the recipe:

Ruth Wacker's Never Fail Pie Crust (From the Congo Cook Book, 1961)

4 1/2 cups sifted flour
1 1/2 teaspoon salt (I used only 1 teaspoon b/c I used salted butter)
1 1/2 cup of shortening (or lard or butter, I used butter, very cold butter)
2 eggs
1/2 cup cold water (or more if needed)
1 1/2 tablespoon vinegar

Combine flour and salt. Cut in the shortening.

Beat the eggs, water and vinegar in a separate bowl. Add to the flour mixture.

Form the dough. If it is a bit dry, add some more water. Wrap the dough in plastic wrap and chill it slightly before rolling out. I made the dough the night before and kept it in the fridge overnight. I let it sit out a bit before rolling it out, but I don't think I'll do that again. It was kinda hard to roll out....

For the inside, everyone has a different way of making their filling. I used 3 lbs of Granny Smith apples, sliced in half and then in thin slices. I tossed them with 1/2 cup flour, a few teaspoons of cinnamon, 1/4 cup brown sugar and a few squirts of lemon juice. I tossed it all together, put it in the crust, dolloped some butter on top and covered it w/ the remaining crust.

I think that it was runny b/c I had the cut apples soaking in cold water and lemon juice so they wouldn't brown. I think that I should have drained them better. Or cut them after I rolled out the dough so they wouldn't have absorbed so much water... The excess liquid I drained out tasted just like apple juice though, so at least it didn't taste bad. :) And as you can see, there wasn't that much liquid. You live, you learn!

Tuesday, December 16, 2008

I hate snow.

So this is what it looked like out my windshield driving home today.... Notice the time at the bottom right of the pic... No? Well, it says 5:53PM. Do you know what that means? That means that after leaving my office at 3:30PM, I was still on I-294 going home 2 1/2 hours later. This was about 1/2 mi before my exit, which is about a mile away from my house. Wanna know how long that 1 1/2 miles took me? 30 more minutes. Which is 5 minutes less than the TOTAL time it normally takes me to get to and from work.
Yeah, so I probably wasn't being safe driving and taking pictures at the same time, but it's a digital camera and I was only going 5mph at the time. See, a picture to prove it:

No joke though, it seriously sucked. I mean it was horrible. Driving in this made me feel like a fist was tightening my stomach, squeezing it tighter and tighter, especially every time I fishtailed. Ugh.
AND!!!! My wiper blades accumulated ice chunks on them, so I only had a 4 inch streak to see through as the blades went back and forth. Thankfully, that four inch streak was right at near eye level. You can see it if you look closely in these pics:
But here I am, home at last. Granted I've been home for about 1 1/2 hours, I had to make something for dinner b/c I was starving. I made some plain buttered noodles b/c I think that was all my stomach could take. But I'm annoyed b/c I was going to make cookies tonight and now I am too tired. Boo!!!

Baby Georgie pictures!

World, meet little Georgie!!!! Isn't he adorable?

Mommy Rita w/ baby Georgie and Big Sister Gabby. Me with little Georgie after dinnerHe is the sweetest little baby ever. He looks more like mommy than daddy, so that's a good thing! He has lightened up a bit; he's now only 7 lbs. He is close to being jaundice, so the docs have a very specific feeding schedule and has to have formula after being breast fed, so we're all keeping our fingers crossed he gets better. Gabby was jaundice when she was born and that was scary enough!
He has the quietest cry too. Gabby was a loud one (still is!!!) but Georgie has a lower toned scream, which I am sure is more pleasant for his mom and dad. And Gabby happily ignores him, staying in her own little world most of the time. Rita did say that at one time, Georgie was crying and she tried to put the pacifier in his mouth, ever so gently and carefully.

Sunday, December 14, 2008

A baby has been born!!!

I am so excited!!! My new nephew/soon-to-be-godson was born on Friday, Dec 12, 2008 at 7:01PM CST. Little Yiorgios Athanasios (Georgie) was born 7 1/2 lbs and 22 inches long. I don't have any pictures of him yet, but I will tomorrow and will update for everyone to see how beautiful he is!!!

Thursday, December 11, 2008

Blackberry/raspberry swirl cheesecake

Mmm..... Cheesecake.....


I had a good time making this cheesecake. NOT! It was such a pain and I had to do it twice! Meaning I had to run out to the store in the icy icky snow and pick up more cream cheese and sour cream. The first time around, I just dumped the eggs in one at a time and then the flour. The batter had clumps of egg covered flour in it, even though I sifted the flour first. I didn't do that the second time.


The cheesecake recipe I used is the base I use for all of my cheesecakes. I have had this recipe forever, I don't even remember where it came from.

Crust:
1 pkg (12-16 oz) of cookies (in this recipe I used Nilla wafers, but you can use Oreo cookies, minus the cream or shortbread cookies. I am anti-graham cracker)
1/4 cup butter, melted

Cheesecake:
3- 8oz pkgs of cream cheese, softened
3/4 cup granulated sugar
3 eggs, beaten
16 ounces of sour cream
2 tbsp flour, sifted
2 tsp vanilla

For the crust:
Put the cookies in a food processor w/ the melted butter and process until finely crushed. Press firmly onto the bottom of the pan and on the sides, if you wish to. Bake at 325 degrees for 4 minutes to set it.

For the cheesecake:
In a large bowl with electric mixer, at medium speed, beat the cream cheese a little. Add sugar and beat until creamy, but don't over beat.
Blend in beaten eggs, sour cream, vanilla and then the flour, slowly and until just blended. Pour batter into the pan.

For the blackberry/raspberry swirl, I took two pints of blackberries and one pint of raspberries and pulsed them in a food processor. I put the blended mix into the a fine sieve (or you can use cheesecloth and squeeze the juice out) and I used a ladle to push the juice through it. I add 2 tablespoons of red raspberry syrup (you can buy it in the syrup section of your local grocery store) and a tablespoon of sugar and simmered it over the stove top. I did this before I started the cheesecake so that it would thicken enough by the time I was ready to pour it all in the pan. I simmered until it was nape, which means that when you dip a spoon in it and wipe your finger along the back, it leaves a clean and doesn't run.
I poured half the cheesecake batter into the pan, then poured some of the berry syrup around the top and took a thin knife and swirled it around. I pour in the rest of the cheesecake batter on top of that and did the same. I then took foil and wrapped it around the bottom and put it in a roasting pan. I placed that on the oven rack and then poured in boiling hot water into the roasting pan to make a bain marie, or water bath. It looked like this:
Kinda looks bloody huh?


Normally, it takes 50-60 mins w/out a water bath. Yeah, about that. Apparently, a water bath makes it take twice as long!!!! After I was done baking for an hour, it was still jiggly. So I left it in for 15 min longer (yes it was that jiggly). Still jiggly. Now, I know what you are all thinking. The middle should still be jiggly when you take it out. This wasn't just jiggly in the middle. The whole thing was still jiggly!!!
So I left it in for a total of 2 hours. And it was not over baked....

When I took it out, I immediately took a butter knife and loosen the cake from the edges so the top didn't split when it cooled.
When it is cooled enough, you can take it out of the pan, but make sure it is completely cooled before you put it in a container and put it in the fridge. You want it to refridgerate this at least four hours, so it is better to make it the night before.

This cheesecake is super creamy and sweet (but not gross sweet). It definitely sticks to the roof of your mouth.... Plan on having a glass of water or milk next to you....

I was a bit disappointed about the swirl in the middle. If you lookclose, you can see it looks like a shadowed lilac color is in the middle part, it's not completely creamy white. Yeah, I was hoping to actually have swirls, but it work. I think if I do a swirl again, I am going to use some seedless jam/preserves and blend that w/ the reduced juice. Maybe that'll make it thicker so it'll show up more....

Either way, this is a great recipe for cheesecake, no matter what you use to flavor it. I just don't think I would use a water bath again, unless I had 4 hours to actually make this. That was a pain.

Monday, December 8, 2008

Carrot cake that even my mother LOVED!

Mmmmm...... Carrot Cake.......

I'm so excited about this cake. It was soooooo good. Everyone, including my picky mother, who loves store bought box mixes and Sam's Club blueberry muffins, LOVED it!!!

I was torn on which recipe I wanted to use. I saw this one on another blog and I was totally going to use this one but then I saw that she had tons of cake batter and in all honesty, I didn't think I could handle that much cake!!!!

So I went on a recipe search. As I have mentioned before, if I am going to use a recipe on a website, it better have reviews! And it better have lots and lots of reviews! Well this one definitely did! (See reviews). Well, I weeded thru most of the pages of reviews and I decided this was definitely the one to use. The only change I made was to cut out some butter. I cut out only a 1/2 stick, but I think next time I might cut out a whole stick. I saw that a lot of people were having trouble getting it out of the pans and even more trouble putting the layers together b/c they were falling apart. I thought that all the butter might have done that, so I cut a little.
Also, I used raw pecans, so what I did before folding them in was get out the frying pan, put a little butter in it to melt and coat the bottom, then toassed the pecans in there w/ some cinnamon sugar. I know there is cinnamon in the batter, but I really like cinnamon. :)
The recipe also says to use 3- 9 inch cake pans, but I only used two. I think that if I had used 3 pans, these layers would have been super thin and I would have needed more frosting. Which isn't a bad thing, but I didn't want to risk having leftover frosting and eating it....
So I put the batter together and popped the two pans in the oven.....
Looks like chicken tortilla soup to me....


While those were baking, I started on the cream cheese frosting! This time I went and bought cream cheese from the store and bought extra for the cheesecake I was making in a few days....

I found a recipe that I had printed of a long time ago in my pile o' recipes and used that, but the technique I learned from one of my fav blogs to read, How to Eat a Cupcake.
I have always softened my cream cheese first, but tried it this way and I honestly think it helped a lot!
The recipe I used was:


2 8ox pkgs of cream cheese
1 stick of butter
2 tsp vanilla
2 1/2 cups of powdered sugar


I used an electric mixer and when I put the cream cheese and butter in the bowl, I cut them in cubes. I thought it would make it easier to mix, but honestly, I'm not sure it made a difference at all. But I mixed the cream cheese, butter and vanilla (cream cheese cold, butter room temp) until it was just blended. I slowly added the powdered sugar and mixed until just smooth. Since it was still pretty cold, I figured that was why it was a bit stiff, so I waited until it warmed a bit before I decided whether to mix it a bit more. After it reached a temp closer to room temp, it softened up enough to make it spreadable.
Doesn't there look like there is so little in there?
But I think I have found my recipe. I might use less butter next time b/c I like the cream cheesy taste so much and I think the butter muted it a bit, but it is definitely smooth and yummy.

So I took the cakes out at the 25 min mark. When I pulled out the toothpick there were still some crumbles stuck to it, so it was definitely time. Unfortunately, the edges were a bit crunchy, but I cut those off. I let them sit a while before taking them out of the pans.... I was scared they would fall apart like some of the reviews said they did, but they held up amazingly. And I got one yummy cake.


This picture was what it looked like when I cut into it still somewhat warm. The cake firmed up ALOT when it was in the refrigerator overnight (see picture below).
Not as moist looking, but it was still very very soft and tender. Yummmm...

Saturday, December 6, 2008

Red velvet yumminess and my continued quest to find the most perfect cream cheese frosting!

So I was super excited about making this cake..... I love red velvet (as you can tell from previous posts). So I actually found a recipe for red velvet that Gale Gand posted on Foodnetwork.com and I figured I would try this recipe b/c I liked the one from More (she was the consulting chef for Patty Rothman when she opened More). So I took the recipe I found here and played with it a bit. First off, I put a bit more cocoa powder (3 tsp) in it than the 1 tsp the recipe called for. The reason being, I like the taste of cocoa in the cake and I didn't think I would get that from only using 1 tsp. I was worried that the color would be darker, but there were no worries, as you can see from the tops that I cut off.
Also, I used butter (1 cup, same as the shortening) instead of veg shortening. I don't really like or use shortening, so I didn't feel like going out and buying it just for this.

When I find a recipe with reviews, I always read the reviews. These reviews were SO mixed!! Some said it was the best and perfect, some said it was tasteless and some said it was dry! I have to say, I wasn't disappointed at all. Now, yes I did play with the recipe... but in all honesty, everyone's baking comes out different every time. I realize that this recipe had cake flour in it and it is pretty hard to over beat w/ cake flour, but if anyone is like my mother and leaves her cakes beating in the mixer for ever, wanting to have it be completely smooth, that affects the outcome. I used 9 inch pans, which caused the very edges to be dry, but it probably wouldn't have happened in the 8 inch pans.
Also, the eighth step of the baking process is carryover baking. Chef always told us that you want to have little crumbly pieces sticking to the toothpick when you take it out. You never want it to come out completely clean! By the time you let to cool down, of course it's going to dry out!!! I took mine out about three minutes before it was done (per the recipe). It was very moist, with the exception of about a 1/8 inch along the edges that was dry, which I cut off when I cut off the top part
that domed.

I did not use the frosing recipe, obviously, since it wasn't cream cheese frosting. I faked it. Honestly, I used a basic cream cheese recipe of Alton Brown's. But the problem was.... I kinda thought my cream cheese was still good, so when I opened the package and saw mold, I had to improvise. I used half a thing of cream cheese that was being used to bagels, not baking and I substituted marshmallow fluff for the rest. Haha, that was funny....
My deal w/ it was that it wasn't cream cheesy enough and it got very sticky. I also realized there wasn't enough so I folded in some cool whip, which also made it easier to smooth onto the cake. (I put a layer of the frosting w/out cool whip in b/w the two layers, but it was so thick and sticky, it was pulling off chunks of the cake).

The result: Everyone LOVED it!! I was shocked. The cake was fantastic! The frosting was not my thing, but no one else really complained about it. My friend Amanda, who doesn't do lots of sweets, loved it so much she came over and said she wanted to just take the cake and run. Which wouldn't have been a good thing since she was the first one to cut into it!!!

So I'm still on my quest to find the BEST cream cheese recipe. Has anyone ever tried using granulated sugar instead of powdered sugar? What happened? I was thinking that it would help cut the chalkiness and the too sweetness, but then would it be grainy from the granulated crystals? I guess if no one else knows, I'll try that next!

I picked up some FRESH cream cheese from the store last night, so I am off to make a carrot cake w/ cream cheese frosting next!