Friday, March 26, 2010

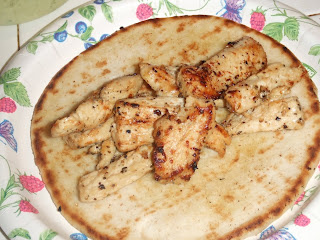
Chicken pita w/ avocado tzatziki and my 100th post!!!

***This is officially my 100th post!!!  I completely skipped over my one year blogoversary b/c I wasn't paying attention but then I was looking on my blogger home page today and omg!  It said 100 posts!***


There are often times I have to make dinner for one and have a hard time making a complete meal w/out having TONS of leftovers. Mac and cheese is something I will make if it's a weeknight and I can take some to work the next day (my mother HATES my mac and cheese, she's a blue box kinda gal).  But there are other nights (the occasional Friday night) when I go to the grocery store, not wanting anything pre-made, not wanting anything that'll make enough for ten people, not wanting anything complicated.  
Well I was browsing my Google reader the other day and saw a blog that led me to another blog.  (I honestly don't remember the post that led me to this post, but it was from the same blog, so I don't feel as bad-Sorry Val!).

Val is one of the people who helped start BloggerAid which is a FANTASTIC organization whose main goal is to stop world hunger.  They even put together this amazing cookbook to help their cause.  This cookbook is awesome.  There are some great recipes in there and I can't wait to buy a new copy (a friend stole mine!!) so I can cook them!  :)
Anyways, check them out!

Back to this dinner.  It was great.  The idea for making a chicken pita from Shannalee from foodloveswriting.com.  She made some chicken pita sandwiches one night at her brother's a couple of months ago and somehow, it popped in my head not too long ago and I just HAD to have a chicken pita. 
Well, of course it needs tzatziki.  But as much as I like 95th Produce's tzatziki, I also remembered Val's post for an avocado tzatziki from Cat Cora's cookbook, and well...  I HAD to have that too.  :)  I didn't have either recipes used with me at the time and when I got home my computer decided to hate me, so I winged it. 

The chicken.
(inspired by Shannalee and the Greekness in me)

Chicken Breast(s)
Lemon Juice
Olive Oil
Black Pepper
Sea Salt
Garlic Powder
Dried Oregano
Dried Basil

Get out a bowl.  Cut the chicken into strips or cubes, depending on how you like it.  Place it in a bowl and squeeze the juice of one lemon over it.  Pour a bit of olive oil, just enough to coat the chicken.  
Crack some black pepper over the top, sprinkle some sea salt, toss in a bit of oregano and basil and coat with garlic powder.  
Cover it with plastic.  Let it sit for a while.  


See all of the delicious spices mixed in with the tangy lemon and mellow olive oil?  That's the beginnings of a beautiful marriage of flavor!
Yes, I am a dork.  Are you just figuring this out???

During that "while" make a side.  You need some veggies right?  Well, here's what you're gonna do.  You're gonna make my FAVORITE veggies.  Roasted Brussels sprouts and cauliflower.  Yum.  

Clean and cut the bottoms off the Brussels sprouts and then cut them in half.  Then, cut the cauliflower into florets. Place them into a small (or large, depending on how many people you're serving) casserole dish, like this (yes, I am a total sell-out, but I actually have this...)
Toss in some coarsely chopped garlic, fresh cracked black pepper, and sea salt.  Coat w/ olive oil.  
 

Bake for about 45 mins (longer if you have more).  Check after 30 mins

"While" you are still waiting, you can make the avocado tzatziki.  Yum

The avocado tzatziki. 
(Inspired by Val and Cat Cora and more Greekness in me)

1 avocado
2 cups of Greek yogurt (what ever fat amount you want!)
1-2 cloves of garlic, minced
1 grated cucumber (don't use the seeds!!!)
Wee bit of sea salt and white pepper
Splash of lemon juice 

After grating the cucumber, either squeeze the excess water out of it by placing it in a paper towel and squeezing it all out, or let it sit for a long time in a strainer.  I prefer the quick method.  :)
Put the yogurt in a bowl, dump the grated cuke on top, add the garlic (more the merrier!), sprinkle a wee bit of salt and white pepper and mix.
Mash the avocado prior to mixing it into the tzatziki.  Once it's mashed thoroughly, squeeze the "splash" of lemon over it and mash a bit more.  Mix it into the tzatziki until it is well blended.  Season a bit more to taste.  :)

Before we get to the chicken, make sure you have your toppings ready.  If you just like pita, chicken and tzatziki, that's fine, but if you really wanna be Greek, like me :) then you need to get some tomato and red onion.  Just slice a bit of both however you'd like and you're golden.

Now back to the chicken.

Get out a pan (size depends on how much your are making).  Get it hot.  Once it is hot, dump the chicken w/ all of the juice and oil into the pan.  There should be more than enough liquid so you won't need to add more.
Let it cook in the liquids until it's done.  You may need to move the chicken around a bit so all sides can cook, but it really requires minimal work. See, I was snapping pictures while it sat there:


Okay, so not the whole time, but I did snap a few.  This one was the clearest.  Darn night cooking.

So once the chicken is THOROUGHLY done (I don't want anyone dying here! If you can't tell, take the largest piece out and cut it in half.  What does it look like?  If it's still pink, toss it back in and go for a bit longer), take out the chicken pieces of the pan and place them into a separate bowl.  You are going to pour the remaining liquids into the garbage.  Don't pour it down the sink!  There is fat in there that will solidify in your drains!

By now, the veggies in the oven should be done, so grab those and let them cool to hot, but not scalding.

Use the pan to warm the pita.  The pan should still have some liquid on it, but not enough to drench the pita, which will be perfect.  Just warm the pita on both sides, collecting some yummy flavor onto it.

Assemble however you'd like.  I put the chicken down, then the tomato and onion and then the tzatziki.  I HAVE to have it just like that.
It's the OCD in me.  Sorry.
 Yummmmm look at that chicken.  Yummmmmmmmmm.  This chicken was so tender and juicy, it was PHENOMENAL.  Mmmm.....


 And then the veggies
Oh Lord yum.

I was so proud at how all of this just came together w/ perfect timing.  I've never been so perfect on my timing.  Go me.

Anyways, this was some major deliciousness.  Seriously.  I'm not kidding.

Oh, btw, the avocado tzatziki held up well for a couple of days. I obviously had more than what when on the sandwich, but I used it for a chicken salad I made the next day (to be posted later).  And then I still had more, which I put on a Subway sandwich at work the following Monday.  So versatile.  :)

Thursday, March 25, 2010

My version of chili and cornbread

I have been using this chili and cornbread recipe for years.  I personally like a cornbread that is sweeter and crumbly, but moist and cake-like too.  The chili recipe was adapted from what I thought would be in Wendy's chili.  If you are a Wendy's Chili fan, you are definitely a friend of mine.
But I still love ya, even if you don't like it  :)

I had yet to make this for my babes, but when we were stuck inside sick the other weekend, this was a perfect way to end the night. 

Chili


Ingredients:

1 pound lean ground beef or turkey (Honestly, there is no taste difference in this dish!)
2 teaspoons olive oil
1 red pepper, diced 
1 green pepper, diced
1 onion, diced
2-3 cloves of garlic, minced
One 15-ounce can petite-diced tomatoes
One 15-ounce can tomato sauce
1 1/2 cups water
One 15-ounce can pinto beans, drained
One 15-ounce can kidney beans, drained 
One 12-ounce can of low-sodium corn, drained (use can use frozen corn too!)
Chili powder, black pepper, cayenne pepper, salt and garlic powder, to your own liking. I use a lot.  :)
Directions:


In a stockpot (I used my beautiful blue cast iron love of my life), over medium heat, brown the meat with a little salt, pepper and garlic powder.  Add water, just to cover by 1/2 an inch, and bring to a boil.  Boil for 2 minutes.  Drain and rinse.  Put aside in a small bowl.
Add the olive oil (the pot should still be hot), diced red & green peppers and onion.  Cook for one minute, then add the minced garlic and spices.  Go easy on the chili powder and cayenne at first.  You can always add more later.  Cook for another minute and add the meat, diced tomatoes, tomatoe sauce, water and beans (make sure you drain and rinse those thoroughly.  Check the seasoning and add more if you wish.  Remember, the longer it simmers, the more the heat and spice will develop.  So if it already spicy, it's gonna be a 10 alarm fire in your mouth after simmering...  Make sure there is just a little less spice than you normally like when you check it.  And make sure it is well mixed before you try it.  
I always check after 30 minutes and add more if needed.  
Let it simmer for one hour, at least. Stir occasionally. 


I realize that Wendy's chili doesn't have corn in it.  But I love corn, despite it not being the easiest thing to digest.  So I add it.  :)
My babes loved this chili.  It was the first time I've made it for him and he was HAPPY.  Neither of us like too thick chili; we both like a little bit of the liquid consistency to make it soupy. 
It was delicious, albeit a bit too spicy for him, so next time, I will cut back.  Oops  :)

Now the cornbread!

I don't remember where I found this recipe, but it's pretty good, so it's stuck around. 

Cornbread

Ingredients:

1 stick butter
1 cup granulated sugar 4 eggs
1/2 tsp baking soda
3/4 cup yellow cornmeal
3/4 cup all-purpose flour
1/2 tsp salt1 can of creamed corn (I use low sodium these days)16 oz plain yogurt (I use low-fat)

Directions:

Preheat oven to 375 degrees F.  Spray an 8x8 baking pan w/ cooking spray.

Melt butter in a double broiler. Remove from heat and stir in sugar. Quickly add eggs and beat until well blended. Add in the yogurt and creamed corn. In a separate bowl, mix together the yellow cornmeal, flour, baking soda and salt until well blended. Pour the wet ingredients into the dry ingredients.

Bake in the preheated oven for about 30 minutes, or until a toothpick inserted in the center comes out w/ little crumbles. 

Check it about 20-25 minutes in.  You can usually tell by the outside how quickly it's baking.

I cut some pretty big squares.  Yum...

I put butter on my cornbread.  I usually cut the piece open like a bun and use slightly melted, super soft butter.  This is super fall apart in your hands crumbly, so it will be hard to butter it w/ anything more firm than that. 

Mike and I love our cheese and diced onions on top.  Yum! I like avocado too, but he doesn't.  Sad :(
 

 Nom nom nom


Tuesday, March 9, 2010

Giveaway on She's becoming DoughMessTic!

http://www.doughmesstic.net/2010/03/05/its-good-to-have-friendsSo there is this AWESOME giveaway on her website.  Go check out the details, but make sure that when you do, you say that you saw this on Niki Theo's blog! 

You can win a KitchenAid mixer for yourself and one for me!!!  I think this is a win-win situation, don't you?

Check it out here:

http://www.doughmesstic.net/2010/03/05/its-good-to-have-friends

Monday, March 8, 2010

Galopita, one of my favorite Greek desserts (or breakfast!)

One of the desserts I love a lot of Galopita, or another version called Galaktobouriko that use fillo dough (which I will cover as well).

This dessert is made every Christmas and every Easter, no matter what.  It's a standard that I plan on keeping when I'm in charge of both holidays.

Basically, galopita is a baked custard of sorts.  Not like creme brulee or creme caramel, but baked and delicious.  From what I have learned, the way my mother was taught and the way I was taught is not a standard recipe. Probably b/c of the Farina used.  Not too many people have heard of Farina, but it is sold right next to the Cream of Wheat in the cereal section.  We love Farina in our house.  On cold winter Saturdays, we'll make a little pot full of the stuff, plain.  Mom puts black raspberry jelly in hers.  I usually pour honey in mine.  Dad can take it any way he wants, but usually honey and raisins.Bob's Red Mill Organic Brown Rice Farina Creamy Rice Hot Cereal, 26-Ounce Packages (Pack of 4)Apparently, they carry is in a brown rice version, but I haven't tried it.  I prefer the old time stuff.  Plus, this version is expensive as hell!!!

Anyways, let's get back on track here.  This recipe can seem complicated, which was why I never learned it before this past Christmas.  But I sucked it up and helped my mom make it.  I'm glad I did b/c it's not as scary as it seemed...
This recipe makes 2- 9x13 pans of the stuff.  Typically, my mom will make one galopita and one galaktobouriko, but the pictures below will only show the galopita.  I will tell you how to convert it to galaktobouriko; don't worry, it's easy!!!

Ingredients:
-1 gallon of milk.  (you can use any milk, but if you use whole milk, cut the Farina by 1/4 cup.  we use skim milk)
-1 stick of butter (we use salted, but it doesn't matter which you use)
-2 cups of sugar
-2 1/2 cups of Farina (or 2 1/4 cups for whole milk)
-2 tsp real vanilla extract
-4 large eggs
-1/2 cup of honey
-2 Tbsp of water

Directions:

Preheat oven to 350 degrees.  Grease 2- 9x13 pans.  If you are using glass pans, preheat the oven to 325 degrees only.

We suggest microwaving (I know, it's so bad!) the milk for about 10-15 minutes first to get it warmed up.  Since there is a tons of milk being warmed, it'll take forever on the stove top from being cold and you will have a greater chance scalding the milk if it's not warmed through first. 
After you warm it in the mircowave, put it on a medium setting on the stove top.  Put the stick of butter (cold, whole, cut up, however you want, just not melted) into the milk while it's heating up.  Also pour in the sugar.  Let the milk heat up until it is slightly bubbling, but not boiling.  Make sure you are stirring frequently w/ a wooden spoon to keep the bottom of the pan from burning the milk.  You can taste the milk to make sure it is sweet enough at this point.  If not, add a bit more sugar, 2 Tbsp as a time. 
While the milk is heating up, beat the eggs w/ an electric mixer, using the whisk attachment.  Beat until they are extremely fluffy and bubbly. 
Once the milk is thoroughly heated and slightly bubbly, turn off the heat and pour in the Farina, slowly and constantly stirring.   You do not want to stop stirring b/c you do not want it to clump up or burn on the bottom!  Add the vanilla.  Keep stirring.
Once it is COMPLETELY mixed and smooth, add a little bit of the Farina mixture to the eggs while they are still beating, to temper them.  Just add a little bit, slowly.  You want to heat the eggs up enough to temper them so that they don't cook when you add them to the Farina b/c then you've just wasted a whole gallon of milk.
When the eggs are tempered, add the egg mix to the Farina and stir hard and fast, you can use the wooden spoon still, or do as I did and grab a whisk.  It makes it easier. 
Once it is completely mixed together, pour the Farina evenly into each greased pan**

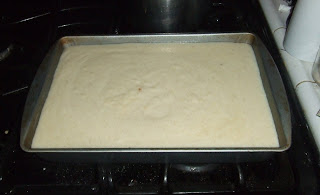
Bake for about 1 hour, until the top is nice and golden brown. 
 
Depending on your oven, I would check it after 45 minutes, just to be safe.  If it isn't ready, this would be the perfect time to take the honey and heat it on the stove top.  Add 2 Tbsp of water to thin the honey out, but you do not want watery honey!  You just want it a bit thinner than normal syrupy honey is.  
 
Once you pull the galopita out of the oven, poke a fork throughout the top of the dessert.  Take the warmed thinned honey mixture and spoon over the top. 
You have to poke holes to get the honey to sink into the galopita.  This is good served warm or cold.
 
As you can see, it's not drenched in honey.  Add as much as you like, but once it all settles, it won't be drenched and soggy.  It'll be delicious  :)
**Okay, for galaktobouriko.  The only difference as I said before was the addition of fillo dough.  When making galaktobouriko, instead of pouring the Farina mix directly into the greased pan, first you are going to layer fillo dough onto the greased pan.  Lay one layer down, letting the edges hang over the sides and ends, lightly brush on melted butter, add another layer, more melted butter, etc.  You are going to want 7 layers, but the key is to make sure you brush a light layer of melted butter on top of each layer before adding the next one.  Pour the Farina mix on top and then add more fillo layers, one at a time w/ melted butter on top of each layer.  Once it is covered, trim the excess fillo dough.  You can then press or tuck the edges in together like you would a double crusted pie.  I admit that I do prefer galaktobouriko over galopita, but I will eat both any day that it's offered to me!

Btw, some people use citrus extracts or liquor in their versions of these desserts. I'm not saying they are wrong and I'm not saying I'm right, but I am just saying that I prefer the simply taste of the vanilla and honey.  I'm not into adding citrus, but it is completely my tastes!  If you want to add a bit of citrus extract or liquor, do it where I added the vanilla.