Monday, June 29, 2009

Another peanut butter and chocolate cheesecake?!?!


Mmm.... this cheesecake was so good, I had to make it again. And I'll make it again... and again... and again.

The only changes I made to this were that I didn't put the extra chocolate shavings b/w the melted peanut butter and the cheesecake. And I also put the hot fudge on top of the cheesecake before baking it this time.
And of course, since I let the cream cheese soften completely before starting, the cheesecake came out smooth and delicious!!!

Actually, the only snafu I had that I was freaking about was that I realized as I was pouring in the cheesecake, I forgot to spray the pan!!! Oops!!! But as you can see, it still came out fine! You can tell it isn't as smooth on the sides as it should be, but hey, no biggie!!! :)

So make it people!!! And eat it!!!

Chocolate Chip Cookies

My manager and I had a discussion a couple weeks ago about these chocolate chip cookies. I've been having troubles w/ my go-to recipe ever since we bought a new oven. For some reason, I have no clue how or why, my cookies have been going flat. Like, so flat, the chocolate chips rise above the actual cookie. It's been depressing b/c they are still soooo good, but just flat. Very sad.
So I've been trying to find a recipe that I love just as much, but are big and fat and yummy. So she mentioned how she saw this chocolate chip cookie recipe on a blog she follows and tried them. First off, the recipe tells you to take 1/4 cup of the dough and cook those for 15-17 min, which is ridiculous to me since my cookies were like a small golf ball and baked for 10 min!!
Also, the ratio of the sugar was dif. And there was a LOT of sugar. The only other little things were that she used one egg and one egg yolk and melted the butter first.
Now I know Nemisah has good taste when it comes to desserts just based on past discussions we've had and treats she's made that I've had. So she sent me the recipe (she couldn't find the blog) and I tried them. Now she raved and raved and raved about them. She took them to her friend's house and he loved them. His wife loved them so much that when he made them she ate way too many and got a stomach ache.
This has got to be a no fail recipe, right?

WRONG!

So ok, they weren't bad but they weren't my chocolate chip cookies. The ones that my mom has been making since I was a little kid. The ones that I can recite to you from memory.
My mom ate them. My dad ate them. My boyfriend inhaled them. Like 10 of them (I used a smaller scoop, not the 1/4 cup). I had 2 before my stomach started hurting really bad...

I'm not the only one who was "meh" about them. Check out Kirbie Cravings for her review. She found them on allrecipes.com which is probably where the girl from the blog Nemisah read found them. It seems that recipe has been on there since 2004? Wow. Great reviews, but yeah. Meh.

I think it really just comes down to taste. I prefer a cookie that's more chewy and less sweet, rather than cakey and VERY sweet. I do think that I might try my recipe again, but maybe try it w/ melted butter. Probably not the egg yolk. I have a feeling that is what helped cause the cakeyness.

BTW, Nemisah said that they tasted very much like her batch, so I don't think I made them wrong...

Here is the recipe if you guys still want to try it:

2 c all purpose flour
1/2 tsp baking soda
1/2 tsp salt
3/4 c unsalted butter, melted
1 c packed brown sugar
1/2 c white sugar
1 Tbsp vanilla extract
1 egg
1 egg yolk
2 c semi-sweet choc. chips

Preheat oven to 325 degrees.
Sift together flour, baking soda and salt.
In a separate bowl cream together butter, sugars and eggs.
Stir in vanilla.
Add dry ingredients (1/3 of the mixture at a time) to wet ingredients until well blended.
Stir in choc. chips.
Line 17"x11" baking sheet with parchment paper.
Drop 1/4 cup of the dough on lined cookie sheet. 5-6 cookies per sheet.
Bake in 325 degree oven for 15-17 minutes. (I used a small batter scoop instead of a 1/4 cup and they took 15 mins to bake.)
Cool on cookie sheet for 2 minutes. Then transfer cookies to cooling rack.

They are super simple to make and it helps that the butter is melted so you don't have to wait for them to get to room temp. So try them and let me know what you think!

Thursday, June 18, 2009

Faux Buttermilk Raspberry Cake

First off, there is a cute little froggie underneath my back step. I wasn't quick enough to take a picture, but in honor of the little guy, here is the little guy's relative. Super Frog!

I am a huge fan of tastespotting.com and foodgawker.com. I have a whole folder in my yahoo account that is dedicated to links of recipes I've seen on there and want to try. And there are tons of emails saved, some w/ more than a few links attached.

This recipe I found on one of them... Can't remember which one, but I just bought a bunch of raspberries and had no clue what to do with them. So when I saw this and saw how simple it is, I decided this was gonna be the one. Thankfully, I didn't have to make cookies like I originally planned since my manager said she was going to make them too. So I let her and figured I could make this for my mom. Although, those cookies will be made!!!

Ingredients:
1 cup all-purpose flour
1/2 tsp baking powder
1/2 tsp baking soda
1/8 tsp salt
2/3 cup sugar plus 1 1/2 tbsp, divided
1/2 stick (4 tbsp) butter, softened
1/2 tsp vanilla extract
1 egg
1/2 cup shaken buttermilk***
1 cup fresh raspberries

Directions:
Preheat oven to 400 degrees, spray a 9 inch round baking dish with cooking spray oil.
In a small bowl, whisk together flour, baking powder, baking soda, and salt. Set aside.
In a mixer, cream the butter and sugar until light and fluffy. Add the vanilla, then beat in egg.
At low speed, mix in the flour mix in three batches, alternating with the buttermilk but ending and beginning with the flour. Basically, add 1/3 of the flour mix, 1/2 of the buttermilk, 1/3 of the flour mix, 1/2 of the buttermilk, then the final 1/3 of the flour mix.
Pour the batter into the prepared pan, and smooth the top. Scatter the raspberries on top or make a design. Sprinkle the 1 1/2 tbsp sugar over the cake before baking.
Bake for 20-25 minutes (I only baked for 20 min and it probably could have been taken out at 18 min, but still fabulous. Serve warm, or room temp. Refridgerate the leftovers because of the milk inside, but pop it in the microwave for 15 seconds to warm it through first.

***I said "faux" in the title b/c I didn't use an actual carton of buttermilk. Since it was such a small amount and I didn't need the rest of what would have been in the carton, I took a 1/2 cup of milk and whisked a 1/2 tbsp of lemon juice (or white vinegar) and let it sit for 10 min. Instant buttermilk!I really should have put more raspberries than this in it :( I wasn't thinking I guess...
They disappeared! It's almost like they aren't in there!If you spray it enough, it will be very easy to get out of the pan. Just flip it upside down onto the palm of your hand then place the cake board on top and flip on its bottom. Doesn't it just kinda look like a yellow cake layer? So much better though...
The raspberries completely sunk to the bottom, I think maybe b/c they weren't completely dry when I put them on on the batter. I tried, but they weren't completely dry and I had to get it in the oven! Still sooooo good though. Even thought the very very top edges look dry, they really weren't bad at all. If I had taken it out two minutes before, it probably wouldn't even have that. And the sugar on top makes a nice little addition to the texture and flavor.
It would also be very tasty with a lemon raspberry glaze, but mom was getting anxious and I had to cut it.
For a lemon raspberry glaze, just mix raspberry syrup and lemon juice and a bit of water, then add powdered sugar until you get the consistency you like. The water coule be optional depending on the tartness you like and obviously, the ratio of lemon to raspberry depends on the flavors you like the most.

Enjoy!

Monday, June 15, 2009

The desserts!!!!

Becky asked me a couple months ago if I would cater the desserts for the reception. At first, I was a bit scared, not sure what she (well, her step-mom really) wanted. So she had me throw out some ideas. One of the ideas (choco-chip cookie cheesecake bars) didn't pan out so well, and I was going to make a couple of other things, but I was trying to figure out what would hold up the best and taste good, but not be too weird or kitschy. So the dessert menu became:
Cake balls (were supposed to be cake pops, but I'll get into that later)
Eclairs
Red velvet cheesecake bars (WAY better than I thought they would be!)
Palmiers, cinnamon-sugar and raspberry
Puff pastry shells filled w/ vanilla pudding and topped w/ fresh strawberries
Pie crust raviolis filled w/ raspberry jam
Chocolate-covered strawberries

Where to start, where to start... Let's start with the easy stuff, shall we???

The Palmiers
I used the same recipe as I did when I made these in baking and pastry class. They came out darker this time. Probably b/c when we made them in class, I only added a wee bit cinnamon to the sugar and this time I think I had about a 60-40 ratio b/w the sugar and cinnamon, respectively.Since I had tons of leftover puff pastry (btw, the store bought kind. I don't have the muscle to be rolling out my own homemade puff pastry, sorry!) so I made the palmiers the same way as the cinnamon-sugar ones, except I rolled seedless raspberry jam instead of cinnamon-sugar. Hmmm... kinda bloody looking right?But they were pretty good, only had a hint of berry taste, not overwhelimg and they weren't sticky, which was a plus!
Next, the pie crust raviolis. My first thought for these were to make them w/ wontons. I made a duck ravioli w/ wonton wrappers once, and they were great. But I couldn't find them anywhere! They were sold out like crazy!
So one of my first ideas w/ pie crust was to make super mini chocolate chip cookie pies, but I was a bit annoyed w/ chocolate chop cookie dough, so I nixed that. I still had the pie dough made so I could make them, but now needed a new idea... Thus pie crust raviolis were born.
I called them raviolis b/c honestly I couldn't figure out another name for them. I rolled out the pie crust to my desired thickness, about 1/4 inch thick. I then used a fondant cutter to cut out the hearts and flowers. I lined them up and covered one side of each w/ egg wash. I then dropped a little raspberry jam onto half of the shapes. I took the other half and pressed them onto the half that had raspberry jam. I pressed them shut and tried to seal all the cracks. I then placed them on the cookie sheet, crushed them w/ more egg wash and sprinkled colored sugar on top. I baked them for 15 mins at 350 degrees. They weren't perfectly closed, but not so bad either. The eclairs were actually also the same ones as I made in class on the same day as the palmiers. I used all water, not a milk and water combo b/c I knew I would be freezing them since I made them a week before. I figured that if I started out w/ a crisper shell, they wouldn't be too soggy. I also used melted chocolate instead of ganache b/c the ganache was so bitter and thick. I just melted some semi-sweet chocolate chips. They were perfect.
The red velvet cheesecake bars were tricky. I'd never made them before and there were sooooo many bad reviews. But I was soooo desperate to try them!!! My recipe went as follows:

The cake bar layer:
1 box of Duncan Hines Red Velvet Cake mix
1 stick of butter, softened
1 egg
2 tablespoons cocoa powder

The cream cheese layer:
2 (8 oz each) pkgs of cream cheese, softended
1 cup granulated sugar
2 eggs
2 tablespoons vanilla extract

Directions:
Preheat oven to 350 degrees F. Spray 9X13 inch baking pan w/ Pam. Cover the pan w/ parchment paper so that the paper sticks to the pan and hangs off the sides. Spray the parchment paper w/ Pam.

In a large bowl, beat the cake mix, butter, and egg until combined. It will look like a dark red clay. Press the mixture into the pan, evenly. I recommend taking a sheet of plastic wrap and covering the mixtures so when you press it into the pan, your hands don't stain. After you've pressed the mixture into the pan, take a fork and stab holes into the dough.

In another bowl, beat the cream cheese and sugar until creamy. Add eggs and vanilla, beat to combine. Spread the cream cheese mix over the cake mixture.

Place in the over and bake for 30 mins. Remove from the oven and let cool completely. Refridgerate overnight. To remove from the pan to cut, lift the sides of the parchment paper carefully from the pan and place on a flat surface. Eat.

I got the idea of the puff pastry cups from the grocery store. There is a brand that makes these shells frozen and they are awesome. Since I had puff pastry, I thought I would try to cut them out like the premade ones. Ugh, just buy the shells. These came out great, but there was a lot of work w. the knife and cutting them while still frozen. Never again.
After I baked the cups for 20 min at 400 degrees F, I let them cool and piped vanilla pudding into the holes. I just made Jell-o brand vanilla pudding, simple and easy. Then I diced strawberries for the top. Easy, right? Yummy too. :)

The strawberries... Mmm... I loved me some chocolate covered strawberries. I realize I am horribly picky saying this, but I hate semi-sweet chocolate. And I used semi-sweet and milk chocolate mixed for these and will never do so again. I should have just used the wonderful Wilton cocoa candy melts for them like I did for the cake balls, but hey, you live and you learn. My beautiful huge, fat organic strawberries from Whole Foods.

I just melted the semi-sweet chocolate over a double broiler and added the milk chocolate slowly to blend in evenly. After the chocolate was a bit cooled off, I dipped all of the strawberries. These were the plain ones...
Then I decorated a few... I had white chocolate too and 6 of the biggest strawberries got dipped into those then the regular chocolate to make tuxedos. I also drizzles some w/ white chocolate ad topped some others w/ sprinkles. Just something to make them more fun.
Only problem was that they started to sweat a bit... Not good, but they were stil good and the chocolate did not ooze off them thank God!

Ah the cake balls! They were supposed to be cake pops, but they wouldn't stay on the stick when I dipped them, even as frozed as they were, so I pulled all the sticks out and re-rolled them. I think they needed to be a bit smaller and perhaps frozen solid? Anyways, I was told to dip the sticks in chocolate then push them thru the balls so that it sticks better. Which I did.

And when they didn't work, I pulled them all out. Basically, you make a cake, whatever flavor, in a 9X13 inch pan. Let the cake dry out. Unfortunately, unless you make a horrible box mix, that can be hard. But don't cover it and essentially, let it sit out, uncovered, overnight. The next day, take the cake and mashed it up w/ a jar of frosting. Maybe not a whole jar. More like 2/3 of the jar to a whole cake. You don't want the cake to be too moist or else you are gonna have a heck of a time rolling them out.
Take a portion scoop and scoop out a small ball of cake. Roll it into a ball and place on a cookie sheet w/ parchment paper. Freeze them overnight.
Right when you are ready to dip them (with or w/out the stick), pull them from the freezer and roll them again w/ your hands to make sure they are the perfect ball shape. Drop them into the melted Wilton cocoa candy melts (easy to melt in the microwave or double broiler). Scoop them out w/ a spoon and carefully drop back onto the parchment. Decorate w/ sprinkles while they are still wet, or let dry and decorate w/ various colored melts. Stick them in the fridge to harden completely. Eat and love them!!!!


I also made a few cheesecake pops, but those didn't work out so well. Well, they didn't look pretty, but every still scarfed them down when they found out there were some hiding that I didn't want them to see.
I scooped those while the cheesecake was partially thawed, then rolled them and dropped them into cocoa powder to roll into better shaped balls. I froze those and dipped the same way as the cake balls.
Freshly rolled
Right out of the freezer and before they were dipped. They pretty much looked like the cake balls after I decorated them. But even yummier. My friends inhaled them!

Becky and Lucky's Wedding reception!!!

My awesome friends Becky and Lucky got married on the Dauphin Island back on 3/22/09 (my birthday!!). I house and cat sat for them while they spent a week and a half getting married and vacationing on that beautiful island...

Becky and I met back in my rental days with Enterprise Rent-A-Car. She started about 9 months after I did and we started getting close when I would help out at the branch she was at. Becky knew Lucky from her high school days, but they never really hung out or anything. He moved onto the military (Go Lucky!) and she went to school for math and education. Somehow she ended up at Erac w/ me. :)

The two of them managed to find their way into each other's lives and it was at the perfect time for Becky! She was soooo anti-love and marriage (I was all pro-love and marriage and she would pretend to gag when I talked about boys). She met Lucky and all that went away when she realized she couldn't be without him. (Somehow during that time, I became anti-love and marriage, although I don't remember why... anyways, it was pretty funny when I would mimic her gagging everytime she talked about him...)

So they got married in March, moved into an awesome apartment after and are now living happily ever after with their sweet little kitty. They had their reception at her parents place this past Saturday and it was a blast... I catered the desserts (check out the following blog). It was an awesome time with good food catered and fantabulous dessert (If I do say so myself!)

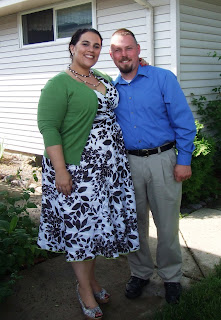
Becky and me
Me and my babycakes. My shoes were so damn cute!!!! :) See above^^^^
The happy coupleLucky feeding Becky cake and her trying not to get it all over her face!

Chocolate Chip Cookie Cheesecake

I found this recipe while searching for some ideas for my friend Becky's wedding reception. She asked me to cater the desserts so I had to include some sort of cheesecake, being that her husband Lucky loves cheesecake and, well, so do I. (Haven't you figured that out yet???).

Anyways, I thought I would play around with it a bit, primarily b/c I'm not a fan of graham crackers and I really like my own chocolate chip cookie recipe, so I went with it. Silly me...

First off, I used Chips Ahoy cookies for the base. I crushed about 12 cookies and mixed it w/ 1/4 stick of melted butter and pressed it into the pan. (I forgot to lay parchment paper in the pan and overlap on the sides. It would have been so much easier later on!!!)
I baked the crust to set, at 325 degrees for 10 mins.

My crust mix

I let it cool, then made the cookie dough. I figured that would need to cool and firm up a bit. So the one thing I didn't notice was that her cookie dough recipe had no eggs. My cookie dough recipe does... I think this is what caused some of the great havoc on my life w/ this recipe. I think if I had just used her recipe (which essentially is my recipe, minus eggs), it would have been a bit better... Heck, a lot better.

Then I made the cheesecake. The same exact way she did. No changes!
I poured the cheesecake into the pan and topped it w/ the cookie dough (I had some left over to eat raw... Mmmm...)

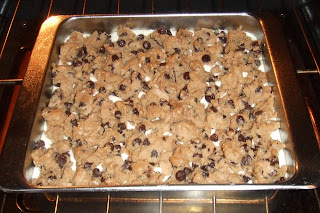
I put it into the oven like so:
Then I baked it for 30 min at 325 degrees. It looked like this:
I would love to try this again, keeping the same crust (since I still have a half bag of Chips Ahoy cookies), but following her cookie dough recipe. I also think that I needed to leave it in a bit longer... The issue I had w/ them was that they tasted doughy. And they were too soft to cut and hold (maybe b/c of the addition of egg to the dough as well as being underbaked??). I needed them to be more firm and more bar-like. Definitely a recipe I will try again and likely try over and over again (if it turns out!!!)